Learning Shaders - Texture Splattering
- ashwinmenezes
- Nov 22, 2020
- 5 min read
Updated: Aug 29, 2022
In this blog post, I want to showcase what I've learned while playing around with Unity ShaderLab code. I hope to make this into a blog series where I work on more complex projects as I progress. Here's hoping I get that far!
For this project, I created a Texture Splatting effect.

You can check out my reference for this project at CatLikeCoding: https://catlikecoding.com
-----------------------------------------------------------------------------------------
Texture Splatting is a method of combining textures by using an "alpha map" or "splat map". Here's an example of the concept below:


Here's a picture of the inspector to demonstrate what we want our output to be like. We have a splat map colored red, green, blue, and black.
We will use the color to determine which of the other 4 textures will be rendered at that particular pixel. The red parts are replaced by Texture 1, The green parts are replaced by Texture 2, The blue parts are replaced by Texture 3, and The black parts are replaced by Texture 4
-----------------------------------------------------------------------------------------
Here's the coding part
-----------------------------------------------------------------------------------------

I started by creating a new shader and adding all the properties for our 5 different textures.
The [NoScaleOffset] tag was added so that all the detail textures used the splat texture's Tiling and Offset values.

Next, I added some references for our Vertex and Fragment programs. We also imported our UnityCG.cginc file which will give us access to a lot of Unity's helper functions.
We also created the variables for all the textures and the splat map's Tiling and Offset values.

The Interpolators struct contains data outputted from the Vertex Program, and input into the Fragment Program.

Here's our Vertex Program, which runs code for each vertex in the mesh.
Our Vertex Program does the following:
It first converts the vertex coordinates from 3D object positions to 2D positions on the camera's viewport
It then applies the Tiling and Offset values to the splat map and stores it in the i.uv variable. This contains the UV values that the 4 other detail textures will use.
It stores the original UV (before Tiling and Offset) in the i.uvSplat variable. This contains the UV values that the splat map will use.

Here's our Fragment Program, which runs code for each pixel (or fragment) on the object in the camera's viewport.
Our Fragment Program does the following:
First, it samples the splat map
Then it returns the sampling of different textures based on the color of the pixel from the splat map
Display Texture 1 if the color is RED,
Display Texture 2 if the color is GREEN,
Display Texture 3 if the color is BLUE,
Display Texture 4 if the color is BLACK
The output is as follows:

-----------------------------------------------------------------------------------------
But what if we wanted to increase the pattern of the splat map?
Can't we just adjust the Tiling?
-----------------------------------------------------------------------------------------
Well, no.
Notice how increasing the Tiling from 1 to 10 has only changed the detail of the texture, but not the splat map's tiling.

This is useful because that means we can easily increase the detail of all of our textures!
But what if we wanted to increase the Tiling of the splat map too?
We know that in the Vertex Program, two variables are being used to store UV, i.uv, and i.uvSplat. We also know that i.uv is the UV after the Tiling and Offset values are applied.

So all we need to do is modify this line in the Fragment Program to make the splat map use the i.uv variable when sampling the texture!

It works!
... Doesn't look great, but at least we know we have the option
-----------------------------------------------------------------------------------------
A "Small" Challenge
-----------------------------------------------------------------------------------------
In the tutorial, the writer notes that it is possible to add a 5th texture and use the Alpha channel of the splat map. I promptly took it up as a small challenge to implement this into my shader.

I promptly popped into my favorite image-editing software and made some transparent patches in the texture.
I then imported the image into Unity and made sure to set Alpha is Transparency to True.
I created a new Texture variable in the shader code, which resulted in lots of interesting-looking failures...


Lots of failures...
-----------------------------------------------------------------------------------------
Starting Over, One By One
-----------------------------------------------------------------------------------------
This was much harder than I thought it would be, so I decided to strip away the other textures and try adding them back one by one.
Based on the failed output I was getting, it was clear that the shader was able to use the alpha parameter when rendering but it didn't have proper instructions on HOW it should do so, hence why the color is all bled out.
It might also have to do with the fact that I didn't have a full understanding of how the Fragment Shader works.

I commented out all the other texture sampling codes in the Fragment Shader and just had one sampling code to detect Alpha.

This is the output when I use a solid green color texture for sampling. This output means that it's using the inverse of the selection we want.

Since we know that the Alpha value (just like RGB values) has a range from 0 - 1.0, we can easily get the inverse we need by subtracting it from 1.

And we have our desired output! Great!
Next, we need to tackle how to separate the alpha from the RGB to stop the 5th texture from bleeding over everything!

I have only enabled the sampling of the first texture.

Looking at the splat map, we can see that the dirt areas are created by using both the RED areas and ALPHA areas. The next step is to ensure that the sampling uses only the RED areas.


Based on what we learned earlier, we know that 1 - splat.a is the transparent region. So if we just subtract that from the alpha region, it should work correctly!


If we apply that logic to all the other texture sampling code, we get this! We're almost done!
I left black for the last because it was admittedly the trickiest to pull off. This is because there isn't a dedicated value to it, it's calculated by finding an absence of RGB values.
-----------------------------------------------------------------------------------------
Using the Alpha Parts
-----------------------------------------------------------------------------------------
At this point, I was quite in a rut. Attempting to apply the previous idea to black would just return extremely bright colors.
Eventually, I figured that the reason why the colors are becoming so bright is that they are being added together giving values higher than 1!

To test this theory, I decided to clamp all of the color values between 0 to 1 before sampling the textures. I also organized my code and created variables for each color.

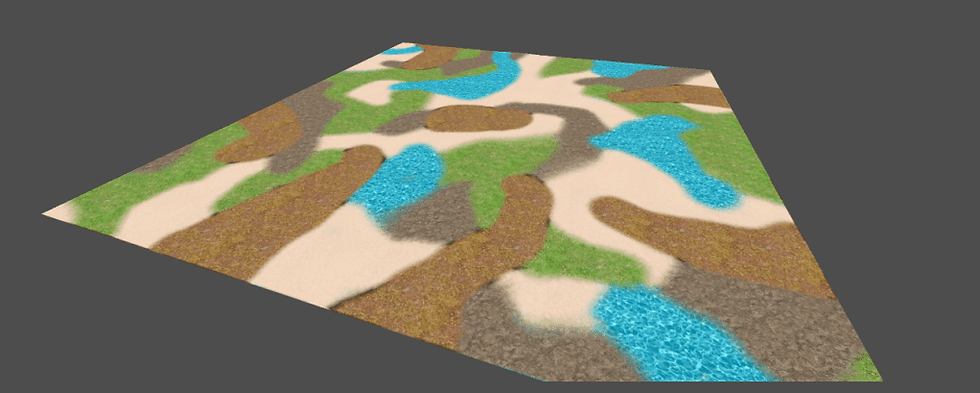
Texture Splattering with 5 textures!
And it works, here's our final product! So to summarize the issues:
Each color value was also including the alpha regions
The colors needed to be clamped to stop the color values from going too high
That's all for this post! You can check out my reference for this project at CatLikeCoding: https://catlikecoding.com


Comments